Search

Random Recipe

Pepperizo

Pepperizo recipe, eat well on universal credit

This is a totally made up recipe. I appreciate it doesn’t look pretty at any stage so far, but cured meats are all about flavour - not appearances.

The main thing about long curing and dehydrating is to make sure that your Salt and Saltpetre concentrations are sufficient to ensure there is no bacterial growth. Clostridium Botulinum is not a welcome friend. Botulism is no laughing matter. A bit of white residue on the outside of the casings at this stage in nothing to worry about, it’s just Salts crystallizing as they migrate through the permeable skins.

Please note that the weight for the curing Salts are per 1Kg. If your scales only measure to 2g, like ours, you’ll need to subdivide the measures to match the weight of meat you are working with.

Ingredients:-

400g of very fatty Pork. We used Belly Pork with the rind removed.
22.5g of Salt - Per 1kg
2g of Saltpetre - Per 1kg
175Ml of cheap Red Wine
40 Black Peppercorns, simmered to soften and drained
2 Tbsp of Hot Smoked Paprika
2 Tbsp of Paprika
3 Tbsp of Cayenne Pepper

Method:-

(1) Simmer and drain your Peppercorns, set aside to cool.
(2) Roughly cut the Pork so it will go through the Mincer / Extruder.
(3) Mince into a large bowl.
(4) Add all the other ingredients and mix by hand very well.
(5) Remove the cutting blade and plate from the Mincer.
(6) Feel the mixture through the Mincer and us the nozzle to extrude into Sausage Casings.
(7) Twist and cut into suitable lengths and tie off with string.
(8) Place in your dehydration box and change the desiccant as required.
(9) Allow 2 months to fully cure and dehydrate.  

We started this in the 18th of December and it’s the 8th of January tomorrow. So we’ve had nearly 1 month curing and dehydrating. They now feel quite firm to the touch but still a little spongy in the middle if you press hard. So another month should do the job. I’ve created a little drying chamber with an air tight box and Silicone desiccant crystals which I pack the around the paper covered Pepperizo. I changed the desiccant every other day for the first couple of weeks. We’re now down it once a week as the greater part of the moisture has now migrated from the meat.


On Facebook

Air Fryer Ribs recipe, eat well on universal credit

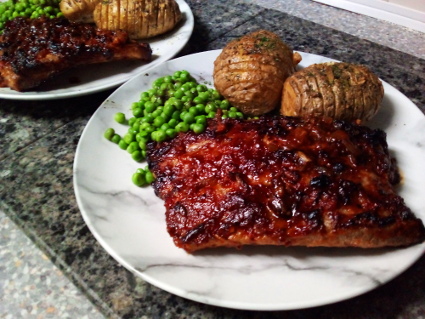
We intentionally bought these Pork Ribs for the recipe. So no yellow sticker gig going on last night!

Ingredients:-

600g of Pork ribs. These came as a rack, so I just cut it in half between two ribs
Oil to Fry
Salt & Pepper to season

Marinade Ingredients:-

½ An Onion, finely diced
2 Cloves of Garlic, minced
1 Tbsp of Tomato Puree
3 Tbsp of Tomato Ketchup
1 Tbsp of Soy Sauce ( Gluten free in our case )
2 Tbsp of Henderson’s Relish
1 Tsp of Hot Chilli Jam sauce

Method:-

(1) Fry the Onions in a little oil on a low heat to soften.
(2) Add the Garlic and fry for a further minute.
(3) Add the Tomato Puree and stir in.
(4) Season with Salt & Pepper.
(5) Add the Ketchup, Soy Sauce, Henderson’s and Hot Chilli Jam and allow to simmer for 2 minutes.
(6) Remove from the heat and allow to cool.
(7) Coat the Ribs on both sides with the sauce, making sure that they are coated evenly.
(8) Place in the fridge for 2 hours or so.
(9) Heat the Air Fryer to 180c and cook the Ribs for 10 minutes.
(10) Increase the temperature to 190c and cook for a further 5 to 7 minutes, depending in the thickness of the Ribs.
(11) Remove and cover to rest.

To be honest we might be trying to ‘Boil Eggs in a solar oven in Iceland’ here. We’ve had much better Ribs cooked long and slowly in the conventional oven. However the was really good.


Social Links

Translate

English French German Italian Portuguese Russian Spanish