Search

Random Recipe

Squid & White Beans

Squid & White Beans recipe, eat well on universal credit

We had a pack of prepared Squid in the freezer from months ago and we’re trying to clear a bit of space. We really are trying, but we just end up freezing pots of left over sauces etc. Endless battle! The Squid was part of a 3 for 1 Fish offer.

So a bit of Googling and recipe modification resulted in this:-

Ingredients:-


5 tablespoons extra virgin olive oil, plus extra for drizzling
2 Onions, diced
1 Stick of Celery, trimmed and diced
1 Fennel, trimmed of the tough outer leaves and cut into ¼-inch dice
2 Carrots, pealed and diced
Canned White Beans, drained
Zest and juice of 1 lemon
1 teaspoon chopped fresh Rosemary (Foraged from a local bush)
2 tablespoons minced Garlic
250g of Squid. Cut into rings with the heads removed and set aside
3 tablespoons chopped fresh Parsley
300 ml of Fish Stock
Salt and freshly ground black pepper

For the Squid Heads:-

Ingredients:-

2 Eggs, beaten
Cornflour
Turmeric
Salt & Pepper


Method:-


(1) Heat 2 tablespoons olive oil in a large frying pan over medium-low heat, add the Onion, Celery, Fennel and Carrot.
(2) Season with salt and pepper, cover and cook 5  minutes.
(3) This allows the vegetables to steam a little and start to get tender. Remove the lid, turn up the heat to medium and cook another 5 minutes.
(4) Add the Cannelloni Beans with the Fish Stock, the Lemon zest and chopped Rosemary and cook 5 minutes.
(5) Pat the squid dry with a paper towel.
(6) Heat 3 tablespoons oil in a second large frying pan, over medium high heat.
(7) Add the garlic and cook 1 minute.
(8) Add the squid and cook 2 minutes, or until opaque.
(9) Season with salt and pepper and the lemon juice and transfer directly to the bean combination.
(10) Toss with parsley, drizzle with olive oil and serve warm or at room temperature.
(11) Add the battered Squid Heads as a further garnish. Be decadent, you know you want to!!!!

Battered Squid Heads:-

Method:-

(1) Heat a fryer to 160c.
(2) Mix the dry ingredients in a bowl.
(3) Coat the Squid Heads in beaten Egg and then dredge in the dry mix.
(4) Deep fry individually until golden brown.
(5) Drain over kitchen roll.

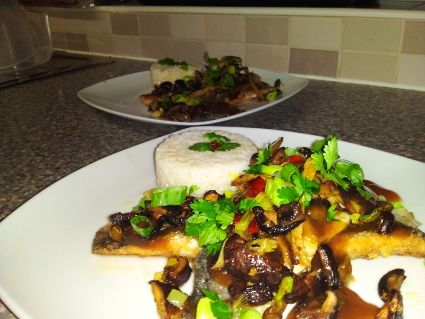
We used the battered heads as a garnish and served the whole meal in bowls. This was an outstanding flavour combination. Although it’s a couple of days ago now, we’re still remarking on it. If we must be in any way critical, the Squid rings only needed a minute, not two. But that aside, this was a cracking meal. Although the ingredients list looks expensive they are all very cheap.


On Facebook

Pepperizo recipe, eat well on universal credit

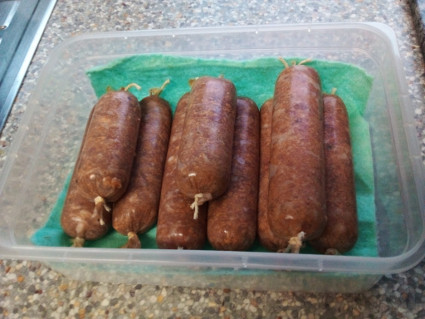
This is a totally made up recipe. I appreciate it doesn’t look pretty at any stage so far, but cured meats are all about flavour - not appearances.

The main thing about long curing and dehydrating is to make sure that your Salt and Saltpetre concentrations are sufficient to ensure there is no bacterial growth. Clostridium Botulinum is not a welcome friend. Botulism is no laughing matter. A bit of white residue on the outside of the casings at this stage in nothing to worry about, it’s just Salts crystallizing as they migrate through the permeable skins.

Please note that the weight for the curing Salts are per 1Kg. If your scales only measure to 2g, like ours, you’ll need to subdivide the measures to match the weight of meat you are working with.

Ingredients:-

400g of very fatty Pork. We used Belly Pork with the rind removed.
22.5g of Salt - Per 1kg
2g of Saltpetre - Per 1kg
175Ml of cheap Red Wine
40 Black Peppercorns, simmered to soften and drained
2 Tbsp of Hot Smoked Paprika
2 Tbsp of Paprika
3 Tbsp of Cayenne Pepper

Method:-

(1) Simmer and drain your Peppercorns, set aside to cool.
(2) Roughly cut the Pork so it will go through the Mincer / Extruder.
(3) Mince into a large bowl.
(4) Add all the other ingredients and mix by hand very well.
(5) Remove the cutting blade and plate from the Mincer.
(6) Feel the mixture through the Mincer and us the nozzle to extrude into Sausage Casings.
(7) Twist and cut into suitable lengths and tie off with string.
(8) Place in your dehydration box and change the desiccant as required.
(9) Allow 2 months to fully cure and dehydrate.  

We started this in the 18th of December and it’s the 8th of January tomorrow. So we’ve had nearly 1 month curing and dehydrating. They now feel quite firm to the touch but still a little spongy in the middle if you press hard. So another month should do the job. I’ve created a little drying chamber with an air tight box and Silicone desiccant crystals which I pack the around the paper covered Pepperizo. I changed the desiccant every other day for the first couple of weeks. We’re now down it once a week as the greater part of the moisture has now migrated from the meat.


Social Links

Translate

English French German Italian Portuguese Russian Spanish